Saturday, October 16, 2010

Download Office 2010 Standalone Individual Installers


Microsoft Office 2010 full installer contains many individual applications like MS Word 2010, Ms Excel 2010, Outlook 2010, PowerPoint 2010, Access 2010 etc. These different software's are combined into a single package known as MS Office 2010. If you want to use only one application out of the office 2010 suite, then instead of downloading the full Microsoft office 2010 package just download that individual office 2010 application using the link I've provided below.

microsoft office word excel outlook

Here are the free direct download links for the individual standalone installers for Microsoft Office 2010. These are links from the official Microsoft download servers.

Microsoft Word 2010

English 32-bit (x86): X16-33159.exe
English 64-bit (x64): X16-33122.exe

Microsoft Excel 2010

English 32-bit (x86): X16-30356.exe
English 64-bit (x64): X16-30329.exe

Microsoft PowerPoint 2010

English 32-bit (x86): X16-32694.exe
English 64-bit (x64): X16-32657.exe

Microsoft Outlook 2010

English 32-bit (x86): X16-32583.exe
English 64-bit (x64): X16-32546.exe

Microsoft OneNote 2010

English 32-bit (x86): X16-32472.exe
English 64-bit (x64): X16-32435.exe

Microsoft Access 2010

English 32-bit (x86): X16-29933.exe
English 64-bit (x64): X16-30247.exe

Microsoft Publisher 2010

English 32-bit (x86): X16-32967.exe
English 64-bit (x64): X16-32930.exe

Microsoft InfoPath 2010

English 32-bit (x86): X16-30496.exe
English 64-bit (x64): X16-30459.exe

Business Contact Manager for Outlook 2010

English 32-bit (x86): X16-56886.exe
English 64-bit (x64): X16-56921.exe

Czech 32-bit (x86): X16-56883.exe
Czech 64-bit (x64): X16-56918.exe

Microsoft Visio 2010 (Standard, Professional, Premium)

English 32-bit (x86): X16-33056.exe
English 64-bit (x64): X16-33029.exe

Brazilian Portuguese 32-bit (x86): X16-33050.exe
Brazilian Portuguese 64-bit (x64): X16-33023.exe

Microsoft Project 2010 Standard

English 32-bit (x86): X16-32864.exe
English 64-bit (x64): X16-32837.exe

Microsoft Project 2010 Professional

English 32-bit (x86): X16-32783.exe
English 64-bit (x64): X16-32756.exe

Megaupload Trick To Get Direct Download Link


If you want to download from Megaupload without captchas or countdown timers, here is a trick worth trying out. It helps to convert megaupload links into direct download links.

Megaupload Direct Download Link Generator

If you are having a download link from megaupload like

http://www.megaupload.com/?d=GVOMXHQ2

then convert it to

http://www.megaupload.com/mgr_dl.php?d=GVOMXHQ2

That is, just replace “/?” of the original download URL with "/mgr_dl.php?" just after the ".com/"

You can place this direct link in download managers for immediate downloads from megaupload.

No Coundown

No Captchas

Maximum Speed

Friday, October 15, 2010

S 60 Series Themes

---------------------------------------------------------------------------------------------------


Hexagon


---------------------------------------------------------------------------------------------------
HTC by Invaser


---------------------------------------------------------------------------------------------------
King Cobra


---------------------------------------------------------------------------------------------------
Laser Skull - Animated


---------------------------------------------------------------------------------------------------
Left 4 Dead


---------------------------------------------------------------------------------------------------
Music


---------------------------------------------------------------------------------------------------
Mystical


Unlocking / Openline HUAWEI usb Modem Kit for FREE


Compilation of freetext sites in the philippines

Ishare ko lang poh ang mga freetext site na nahalukay ko sa iba't ibang websites.. Sana makataulong to sa inyo..


freesms.cloudsapp.net(international)
unlitxt.org(local)
smsflick.com>need to reg.
xtremelink.wen9.com
for-ever.us
free.hostsavers.co.uk
unlitext.codesonweb.com
unlimitedtext.tk
pirata.wen.ru
razul.wen.ru
txt-zone.com
txt-zone.com/featured_ads.php
macneth.wen.ru/Pages/freesms.html (credit to sir macneth)
avecswap.wen.ru/services/freetxt.html
www.katext.com
freesms.smsix.net
txtmate.com
www.ulink.com.ph
www.kuripotxt.net
www.pinoyfreetxt.com
160by2.com
m.smsjive.com (credits to sir natzky)
unlitext.codesonweb.com


CREDITS TO ITS RESPECTIVE DISCOVERER AND CONTRIBUTEr


NOTE: para poh mapagana yung ibang international freetext sites, ganito poh ang gagawin natin..
EX:Piliin poh natin ung Country receiver or carrier ng USA tapos palitan lang poh natin yung starting ng international number format ng usa. see the screenshot below..


GANITO POH ANG GAGAWIN NATIN:


100%Free airtel gprs~ latest all opera 160by2 cricketzenga newshunt ebuddy ucweb teashark and many more free gprs handlers


HI FRIENDS NOW U NOT NEED TO DOWNLOAD ALL FILES ONE BY ONE JUST DOWNLOAD THE ZIP FILE AND IN THE ZIP FILE I HAD PACKED ALL SOFTWARES C BELOW SO JUST DOWNLOAD IT AND ENJOY !!!!


download all moded software+prov4s40+details.zip[2.60mb]

Thursday, October 14, 2010

Watch Blocked YouTube Videos Even If It Is Blocked In Your Country/Location

Internet users face problems accessing Youtube website when different countries decide to try internet censorship and ISPs block access to Youtube You could be staying in countries like the UK and USA and may not be able to watch certain videos on Youtube. The message “This video is not available in your country” comes up. Now this is not because of any censorship or ISPs blocking access to this video but this is because the owner and poster of videos use Youtube filters to limit these videos to one or more countries.


There are many such videos like Armor for sleep – Hold the door is not available outside USA and BBC’s clip Stop calling it a Honeymoon can only be watched in the UK.
Bypass Youtube Region Filtering To Watch Blocked Youtube Videos

Youtube determine your physical location (country) from the IP address of your computer. This trick can bypass this country-specific limitation.


If the URL of Youtube video is
Code:
http://www_youttube.com/watch?v=abcdefghijk

replace watch?v= part with v/ sothat your new URL is now This simple trick can do the magic and you can watch a blocked Youtube video in your country.

Rename The Start Button in Windows XP to your desired name

Change windows start button in xp

I am not going to show you any complex methods to Rename the Start button in windows xp. Earlier we used Resource hacker tool to Rename the Start Button manually. This involved complex steps that was a way difficult for beginners. If you want to do it manually follow this link

Rename Windows Xp Start button using Resource Hacker

In this post I am going to show you a simple tool that will do all the work. Its called as “Start Button Renamer”.

Renamer or Change windows Start Button

This tool looks this way. Simply enter your desired word in New Label Text box and Click Rename It! . Hurreee. Your Start button text is changed to your desired text.

Description:

“Start Button Renamer” is a simple utility for renaming the [Start] button under Windows XP. With this freeware tool, you can change default label of the [Start] button with your own text. This is great when you want to tease your friends or when you intend to have a greater variety in Windows.
“Start Button Renamer” also is Open Source. This means that the source code of the program is presented with it, so that you could change it according to your own taste and wish, therefore you can add more possibilities on it

Download Start Button Renamer

Install Windows xp in less than 15 minutes


who frequently install windows xp operating system. Normally OS installation takes around 40 minutes to complete, but through this trick you can now save 10-15 minutes. This simple tricks goes this way.

1. Boot through Windows XP CD.

2. After all the files are completely loaded, you get the option to select the partition. Select “c”.

3. Now Format the partition, whether it is normal or quick with NTFS or FAT

4. Once the formatting is completed, All the setup files required for installation are copied. Restart your system by pressing Enter.

Now, here begins the Simple trick to save 10-15 minutes.

5. After rebooting, you get a screen where it takes 40 minutes to complete or finalize the OS installation.

6. Now, Press SHIFT + F10 Key -> This opens command prompt.

7. Enter “Taskmgr” at the command prompt window. This will open Task Manager.

8. Click the Process Tab, here we find a process called Setup.exe -> Right Click on Setup.exe -> Set Priority -> Select High or Above Normal. Initially it will be Normal.

Thats it, no more work to do. Relax your self and see how fast the installation process completes

Recover Windows XP Administrator Password


Administrator login password or do you want to hack or change the Administrator password of the windows system at your School, College or office, then this Trick is just for you.

Follow the steps below

1. Restart your computer

2. Press F8 key continuously until you get a black screen where you have many options to start you operating system

3. From the options “Select the Safe mode with Command Prompt”

4. When your computer starts in DOS mode, type the following commands

net user

This command displays the list of users on this OS in ROWS

5. Now type the following commands to reset the windows Administrator password

net user username password

Note: Enter your username above and space then password.

Then it asks the new password without the last password.
Now type your new password ******
Again retype your new password********
Note: When you type the password, it will not be displayed

Shutdown Computer With Command Prompt or shortcut for shutdown

Tips to shutdown your computer automatically after specific time

Here is a trick to shutdown your computer at a specific time. You might be thinking what great about it, well you can shutdown your computer without the use of any software. Just shutdown your computer at specific time from RUN Command. For example if you wish to shutdown at 09:45 am. Type this in

Start=>Run

Type Code: at 11:35 shutdown -s

To cancel or Abort the shutdown:

Type Code: shutdown -a

Type Code: “shutdown –s –m\\computername –t60”. This command will shutdown the computer on network if you have administrative access. Here computername needs to be replaced by the exact computer name of the computer on the network to work.

Auto shutdown computer using run command

Alternative method to create a shutdown timer or simply computer shutdown shortcut

Step 1: Right click on your desktop and choose “New=>shortcuts”.
Step 2: In the box that says “Type the location of the shortcut”,
type in “shutdown -s -t 3600” without the quotation marks and click next.

Note: 3600 are the amount of seconds before your computer shuts down. So , this means 3600 seconds = 60 mints (1 hour). You can change the value in the above code. You can even create multiple shutdown shortcuts. For example a computer shutdown shortcut for 30 minutes, 1 hour, 2 hours, 5 hours etc.,

Step 3: Make up a name for the shortcut and you’re done.

Optional Step 4 : You can change the icon by right clicking=>properities=>change icon=>browse

To abort or cancel the shutdown:
To make an abort key to stop the shutdown timer just create another shortcut and make
the “location of the shortcut” to ” shutdown -a” without the quotes.

Sunday, October 10, 2010

How To Create An Unattended Windows XP Disk


An unattended XP disk is a customized installation disk that allows you to perform a Windows installation with minimal effort (once the disk is created). All of the effort takes place in creating the unattended disk, but it is well worth it. With an unattended XP disk, you can preselect all of the options you wish to use for the installation.

When you proceed with an unattended installation, you do still have to manually select the drive where you wish to install Windows (during the blue screen portion of the setup). However, once you’ve dhttp://www.blogger.com/img/blank.gifone that and started the installation you can walk away, grab a cup of coffee, eat some french toast, brush your teeth, check the weather, and by the time you get back you’ll see your new Windows XP desktop.

To create an unattended disk, you will of course need a Windows XP installation disk. You will also need to download nLite. nLite is a free program that allows you to create customized XP installation disks. Customizations you can perform include the integration of service packs, Windows updates, addition of drivers, preselection of installation options, preselection of components to install, and even more.

As a first step to unattended windows setup reference, you will need to get the latest Windows XP updates for your installation disk. Which updates you will need depends on how old your installation disk is. If you have a very old disk, you may need to download service pack 3 in addition to the updates that have taken place since the release of service pack 3. In the installation instructions below, you will learn how to find out whether or not Service Pack 3 is included on your installation disk.

Launch nLite, select your language, and click Next. Click the browse button to navigate to your the location of your installation CD. You will then be prompted for a location on the hard disk to store the files for processing. Select where you want to store the files and wait for the files to be copied.

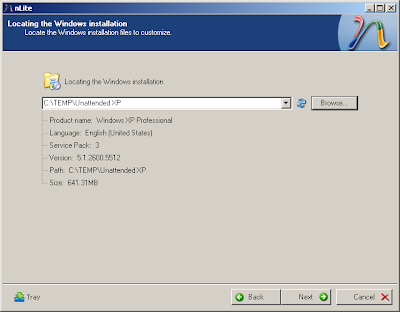
Once the files have completed copying, nLite will detect what version of Windows XP is on the installation CD. If it says the installation has Service Pack 3, then you will not need to download the service pack. Otherwise you can download the service pack here. Proceed to the next step.

Since this is the first time you’ve run nLite, you will not have any presets. Just click Next to advance to the Task Selection page. On the task selection page, select Hotfixes, Add-ons, and Update Packs, Unattended, and Bootable ISO. If you had to download Service Pack 3 because you have an older version, select Service Pack as well.

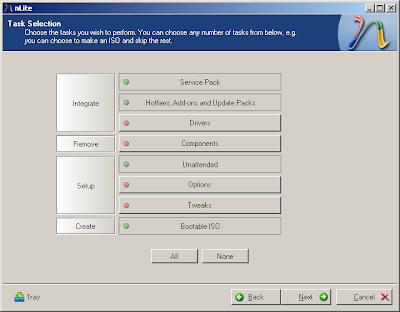
If you are feeling adventurous, you can also include Drivers, select Components for removal, select Options, and Tweaks as well. These are more advanced options that will not be discussed in this particular How-To. Click the Next button to proceed.

If you need to integrate Service Pack 3, you will advance to the Service Pack page. Select the location of where you downloaded Service Pack 3. Once you’re done, click Next to advance to Hotfixes, Add-ons, and Update Packs.

Click the Insert button (in nLite, not on your keyboard) and navigate to the location of the update pack. Click Next to proceed to the Unattended settings. In order to avoid any interaction with the installation (other than selecting/formatting the hard drive in the blue screens), you will need to update the following:

  • General Tab: Set Unattended Mode to Hide Pages
  • General Tab: Enter your Product Key
  • Users Tab: Password for the Administrator login (or check Blank password)
  • User Tab: Add a new User and set the password (or check Blank password)
  • User Tab: Set the Autologon to the new user you just added
  • Owner and Network ID Tab: Computer Name
  • Owner and Network ID Tab: Workgroup
  • Owner and Network ID Tab: Full Name
  • Owner and Network ID Tab: Organization
  • Regional Tab: Timezone

Once you’ve updated those settings, and any others you would like to update, click Next. Continue when prompted if you would like to start the process. When the process is complete, click Next to proceed to the Bootable ISO section.

Under Mode, select whether you want to Create an Image or perform a Direct Burn to a CD. Direct Burn is probably the easier choice, because nLite will write it directly to disk. When you’ve made your selection click Make ISO. If you decide to burn to an image, use your favorite image burning software to write it to a disk.


That’s all there is to it! Just take the disk, pop it into the target machine, boot it up, select where you want to install/format, and then go take a little walk. Upon your return, your machine will have a fresh installation of Windows XP running on it!