Thursday, September 30, 2010

How to Save watched video from Internet / WEB

Have you ever watched any tutorial or video over the Internet and then wished to save it on your local disk? This is very common for anyone that he first watch the video and then download it to the local disk if there is an option available to do so. But as we recall many websites does not have this function, to download any video from their server. But do you know for every video that is being played back on a system must be cached on the local disk.. this way it is fact that this must be saving anywhere on the local disk and only we need to got the trick/application which can derive the info from the browser cache. So is this really possible?

Yes! VideoCacheView solves it for us, it can automatically search the entire browser cache and if there is any video if you watched will automatically be listed in its window.


Download Video Cacheview

So the next time even you watched any video from Internet even if it is YouTube or any other site you can save the cached video to any location you want or can play it again direct from the cache.. Isn’t this tool is much required by the video lover community plz don’t forget to share this article or tool to your friends…


Sunday, September 26, 2010

How to use your Gmail space as hard disk

Gmail Drive enables you to use your Gmail account as a virtual storage drive that is accessible from Windows Explorer. It adds a drive icon to My Computer that allows you to access your storage space like any other folder, and upload files via drag and drop. The uploaded files appear in your Gmail inbox as messages with the file attached. The messages have a special subject, so you can use the Gmail inbox tools to automatically move them to a separate folder.

If you’re having extra space on your Gmail account and you don’t have extra space on your hard disk, you can use that free Gmail space as a hard drive. Using a cool freeware program called Gdrive will create an extra drive inside My Computer, and every time you use this drive i.e. use files from it, is actually downloading and uploading to your Gmail account.

1. First download Gmail Drive


2. Extract the files from the downloaded file and click Setup.

3. After the installation go to My Computer and an extra drive called Gmail Drive will appear

4. Double click it and a window with the user name and password will appear


Gmail space as a hard drive

Enjoy your extra drive space:)

Thursday, September 23, 2010

Hacking Globe Tattoo Broadband. Featuring: Enable WLAN Plugin.

Intro:

The code of the globe tattoo are combinations of html/smf and other programming languages. Madali lang intindihin yung code kung web developer ka at kung programmer ka.

Now let's start hacking Globe tattoo:


1. Locate the globe tattoo icon on the desktop then right click and choose Open file location


2. Find and locate the folder named config and open it.


3. There are 2 xml files inside the folder. Locate the file named PluginsConfig, right click and choose edit.


• This is the content of the xml which is much like similar to html/smf coding. If you are knowledgeable in using these codes then you can find more secrets on your globe tattoo.


4. In that xml file, scroll down the page and find this texts:

!--item name="WlanPlugin" clsid="7545FB07-0E7A-4F27-A449-872DB09C106D"/--


• All you have to do is to remove the comment code which is the string !-- and – until it looks like this:


5. Save the file by pressing the keys Ctrl + S then you’re done. Your globe tattoo WLAN plugin is Activated.

6. Open the globe tattoo program and the Interface. This is mine.


*If you want to activate other features/plugins of broadband then you can follow the steps I demonstrated in activating the WLAN. Just the same steps.

*You can find the other features/plugins of the broadband by opening the file named pluginslib at the same folder

Ang trick p0 na ito ay gumagana sa globe tattoo e1552 eto po gamit ko,
gumagana din sa e1556 huawei, Paki try nyo na lang sa ibang model. Pag sinundan mo yung mga steps na iyon ma-eenable mo yung WLAN or Wi-Fi ng broadband mo. Of course para matest mo ay dapat nasa wi-fi Zone or hotspot ka. Kung advantage naman tinatanong niyo of course magagamit mo na wi-fi reciever ng broadband mo.

How to increase / boost signal of your globe tattoo


Hello, this is my first post regarding globe tattoo signal booster.

madami kasi sa ka sb natin na ang problema ay mahina ang signal.
marami na din ang thread dito na gumamit ng satellite dish (kaldero trick), alluminum foil trick etc.

ang thread ko na po ay ang pag gamit ng extension wire para
di na kayo bumili ng usb extension sa CDR king.

Tools needed:
-extension wire (manipis lang)
-screw driver
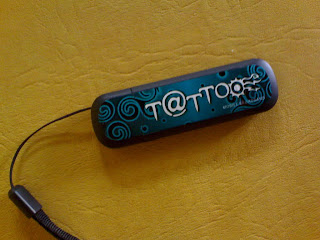
-syempre globe tattoo kit

_________________________________________

eto po yung previous signal ko.


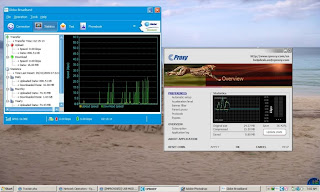
sa signal meter ko is FULL BAR ang GPRS.

kaya nag isip ako ng way para tumaas ang signal to WCDMA to HSDPA, lumabas ako ng bahay kasama ang laptop,
napansin ko na nagbago ang signal from GPRS to WCDMA,
kaya 100% sure ako na magiging HSDPA ang signal ko
kung mailalabas ko ang Globe Tattoo modem ko.

Lets Start na po.

Steps by steps procedure

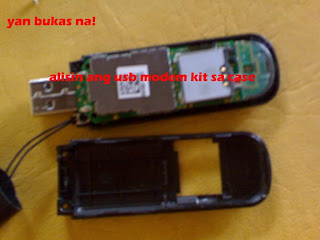
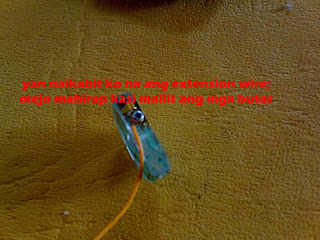
-buksan natin ang Globe tattoo modem
look na lang sa mga attached image


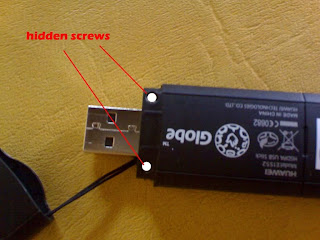
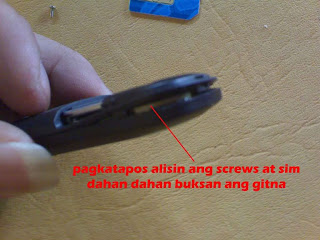
alisin muna ang sim para madaling buksan


tapos dahan dahang buksan sa gilid yung modem.
ingat lang baka masira ang casing ha.


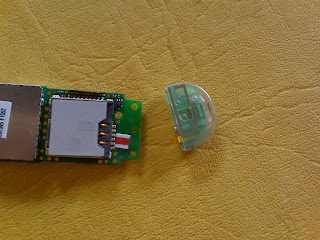
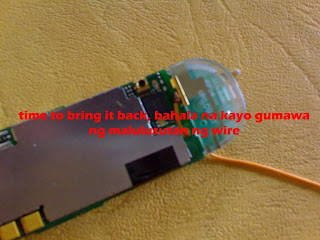
ito na yung RF signal receiver ng globe tattoo.
all we need is to extend xa kasi nga nakadikit sa kit.

try to remove yung screw ng RF receiver.


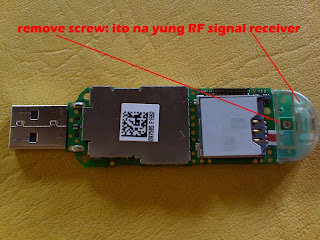
dito tayo mag lalagay ng extension wire. look sa image


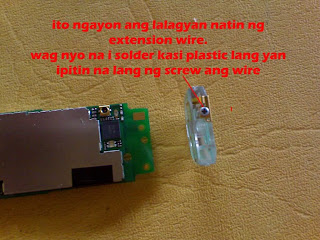
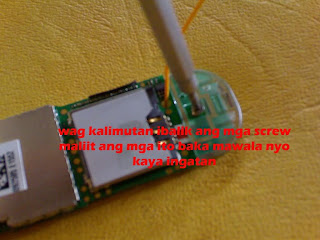
nag ipit na lang ako ng extension wire sa screw kasi ayaw ko i mount yung wire sa modem kit baka masira dahil nga plastic lang ito.


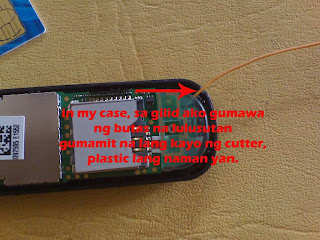
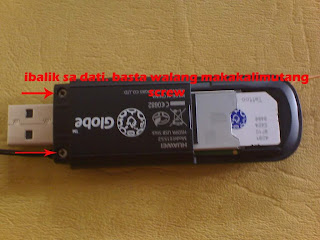
pag naikabit nyo na yung extension wire, ibalik na natin sa dati ang tattoo kit
kayona bahal maghanap ng butas na lalabasan ng extension wire ha
wag nyo kalimutan ang mga screw na tinanggalnyo ha,
wag iwala dahil mahirap humanap non.


dito ako ang lagay ng butas para sa extension wire ko.


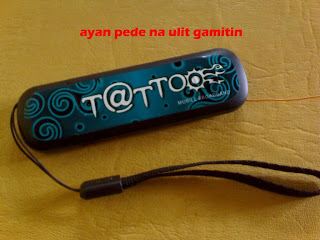
yan.....tapos na tayo.


eto po ang picture after malagyan ng extension wire.


Oras na para masubukan kung uubra na.....


although di xa nag FULL BAR sa HSDPA signal,
kasi di ko naitaas ang pinagdikitan ko ng extension wire sa alluminum antenna ng tv,
pansin naman na from GPRS nag boost xa to HSDPA.

hehehehe

feedback na lang po kung umubra sa inyo.

Installing Flash Player Plugin on Firefox without having Administrator Access or Premissions

Last updated on Tue, 2010-02-02 16:43. Originally submitted by fabio on 2007-02-19 16:32.

UPDATE: The following guide, originally written for Firefox 2, has been used successfully on Firefox 3, Firefox 3.5 and Firefox 3.6. Users of Firefox Portable edition (versions 3, 3.5 and 3.6) also have been successful using this guide.

The Windows computers available at my University permits login only by autenticated users (students) who don't have Administrator access and permissions.

Installing software on those PC is then not possible.

Recently they finally installed Firefox 2 but without the Flash plugins, which is absolutly useful/needed.

I then tryed to install the Flash Player using the "standard" way (click on the missing plugin link then install the plugin..). However without administrator plugins it was not possible to install.

Then I started doing some tests trying to install the plugin manually. Now I have it installed and working perfectly!

This is how I managed to install it without administrator permissions:

1. Download the XPI archive of the Flash Player Plugin to your hard disk (right click on the download link then "Save link as.."). XPI archives are only ZIP files containing the files used by the plugins.
2. So you can safely rename the file you just downloaded, called flashplayer-win.xpi, into flashplayer-win.zip (you are changing its extension from .xpi to .zip)
3. Extract the files in the archive. You can use any program capable of opening .zip files (WinZip, WinRAR or the free and great 7-zip). There are also websites which can uncompress archives: wobzip.org.
4. Copy the files flashplayer.xpt and NPSWF32.dll to %APPDATA%\Mozilla\Plugins\
* %APPDATA% is not a real folder. It's an alias. By inserting it in your windows explorer address bar, you'll be redirected to the real folder which holds your applications profiles and settings. The location of this folder depends on various setting that's why we need the alias and not an absolute path.
* You can open this folder simply choosing "Start → Run → Type in %APPDATA% → OK".
* In case you don't have a Plugins folder you can create one and place your files there.
5. Restart Firefox
6. Enjoy your flash websites!

Convert Windows XP SP2 into SP3 without any setup program: simple trick

Theses days the technology is changing very rapidly and with in a short span of time we have to update with the new patches ans supplement for several software, though these are always in the favor of the end user but most of the time we just don’t want to implement these latest changes. Like me, a few days back have bought a new game CD which requires windows SP3 installed to run it but I just don’t want to do so. So should i left it or there are any alternatives… Yes I have found one… described below

As for most of the programes they usually look into the info about the system status into the registry file to locate the software and patches which decides their performance. So here is the trick to fool such programs which requires Windows XP SP3 patch by altering the Windows XP SP2 version info. To do so go to windows run command (Using windows key +R) and then, type regedit to open Registry Editor. So now you have registry editor opened then only browse to the following key

HKEY_LOCAL_MACHINE\SYSTEM\ CurrentControlSet\ Control\ Windows

and modify “CSDVersion” from “0×00000200” (SP2) to the Windows XP SP3 value of “0×00000300” and reboot

This is the simple trick which will bypass the information so that any program require SP3 (and you only have Sp2 ) would work. So now enjoy; with all the gaming fun as I do. But don’t forget to subscribe and enter your valuable opinion in the comments section.